How to Install Icinga 2 and Icinga Web 2 on CentOS 7
5 people liked this article
A. Introduction
Icinga is a tool or application that functions to monitor resources on your server or environment.Such as RAM and CPU usage resources in graphical form. Or you can monitor services such as web servers or mail servers.
Monitoring on the server needs to be done, especially if the server is production. Because if a service have critical problems, we quickly find out and check on the server/application to solve the problems.
B. Installation and Configuration
1. Update the system
# sudo yum install epel-release -y
# sudo yum update -y
# sudo shutdown -r now
2. Install Apache
# sudo yum install httpd –yDisable the pre-set Apache welcome page:
# sudo sed -i 's/^/#&/g' /etc/httpd/conf.d/welcome.confForbid Apache from exposing files and directories within the web root directory /var/www/html to visitors:
# sudo sed -i "s/Options Indexes FollowSymLinks/Options FollowSymLinks/" /etc/httpd/conf/httpd.confStart the Apache service and get it started on boot:
# sudo systemctl start httpd.service
# sudo systemctl enable httpd.service
3. Install MariaDB
Use the following command to install MariaDB:
# sudo yum install mariadb mariadb-server -yStart the MariaDB service:
# sudo systemctl start mysql.service
# sudo systemctl enable mysql.service
Secure the installation of MariaDB:
# sudo /usr/bin/mysql_secure_installationDuring the interactive process, answer questions one by one as below:
Enter current password for root (enter for none): Enter
Set root password? [Y/n]: Y
New password: <your-password>
Re-enter new password: <your-password>
Remove anonymous users? [Y/n]: Y
Disallow root login remotely? [Y/n]: Y
Remove test database and access to it? [Y/n]: Y
Reload privilege tables now? [Y/n]: Y
Note: Replace <your-password> with your own MySQL root password.
Modify the authentication plugin of MySQL root user:
# sudo mysql -u root -pUse the MariaDB root password you set earlier to log in.
In the MySQL shell:
UPDATE mysql.user SET authentication_string=PASSWORD('<your-password>'), plugin='mysql_native_password' WHERE user='root';
FLUSH PRIVILEGES;
EXIT;
Note: Replace <your-password> with your own MySQL root password.
4. Install PHP
Install PHP 7.0 and several extensions for Icinga 2 and Icinga Web 2:
# yum -y install rh-php71-php-json rh-php71-php-pgsql rh-php71-php-xml rh-php71-php-intl rh-php71-php-common rh-php71-php-pdo rh-php71-php-mysqlnd rh-php71-php-cli rh-php71-php-mbstring rh-php71-php-fpm rh-php71-php-gd rh-php71-php-zip rh-php71-php-ldap rh-php71-php-imagickThen you need to setup the proper timezone for your machine, which can be determined from the PHP official website. On my server instance, the timezone value is "Asia/Jakarta".
Find the line:
;date.timezone =
Change it to:
date.timezone = Asia/Jakarta
Save and quit:
Restart the Apache service in order to put new settings into effect:
# sudo systemctl restart httpd.service5. Install Icinga 2 and its plugins
On CentOS 7, you can install Icinga 2 and its plugins using the icinga YUM repo:
# rpm --import https://packages.icinga.com/icinga.key
# yum install https://packages.icinga.com/epel/icinga-rpm-release-7-latest.noarch.rpm
Install Icinga 2 and several plugins using the Icinga APT repo:
# yum -y install icingaweb2 icingacli httpdEnable the Apache service to start automatically at the system startup.
# systemctl enable httpdSelinux
If you are running Icinga Web 2 with SELinux enabled, then consider installing the below package to set policy for Icinga Web 2.
# yum -y install icingaweb2-selinuxFirewall
Run the below commands to allow HTTP traffic to access Icinga Web 2 from external machines.
# firewall-cmd --permanent --add-service=http
# firewall-cmd –reload
6. Setup the Icinga 2 IDO modules
Install the IDO (Icinga Data Output) modules for MySQL
# sudo yum install icinga2-ido-mysql -yIn the Configuring icinga2-ido-mysql wizard, when being asked whether you want to enable Icinga 2's ido-mysql feature, choose <No>. We will manually enable this feature later.
When being asked whether you want to configure a database for icinga2-ido-mysql, choose <No>. Instead, you can manually create a database as explained in step below.
Create a database for Icinga 2
Log into the MySQL shell as root:
# sudo mysql -u root -pIn the MySQL shell, create a database named icinga and a database user named icinga with the password icinga, and then grant privileges on this database to this database user.
 CREATE DATABASE icinga;
GRANT SELECT, INSERT, UPDATE, DELETE, DROP, CREATE VIEW, INDEX, EXECUTE ON icinga.* TO 'icinga'@'localhost' IDENTIFIED BY 'icinga';
FLUSH PRIVILEGES;
EXIT;
Import the Icinga 2 IDO schema
# sudo mysql -u root -p icinga < /usr/share/icinga2-ido-mysql/schema/mysql.sqlWhen prompted, input the MariaDB root password to finish the job.
Enable the IDO MySQL module
# sudo nano /etc/icinga2/features-available/ido-mysql.confFind these lines:
//user = "icinga",
//password = "",
//host = "localhost",
//database = "icinga"
Uncomment them as below:
user = "icinga"
password = "icinga"
host = "localhost"
database = "icinga"
Enable the ido-mysql feature:
# sudo icinga2 feature enable ido-mysql
# sudo systemctl restart icinga2.service
7. Install Icinga Web 2
Icinga CLI is used for performing administration tasks in the command line. Both Icinga Web 2 and CLI must have access to logs and configurations. Add web server user (apache to the system group (icingaweb2)
# groupadd -r icingaweb2
# usermod -a -G icingaweb2 apache
Create the Icinga Web 2 configuration directory.
# icingacli setup config directory --group icingaweb2Restart both Apache and PHP-FPM services.
# systemctl restart httpd
# systemctl restart rh-php71-php-fpm
Generate a setup token for later use in the Icinga Web 2 web installation wizard
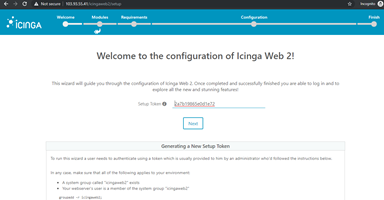
# sudo icingacli setup token createThe newly generated setup token is: ……………………..
Initiate the Icinga 2 installation wizard in the web interface
Point your web browser to the following URL:
http://<your-serve-ip>/icingaweb2/setup
Copy and paste the generated token on the setup page and click Next.
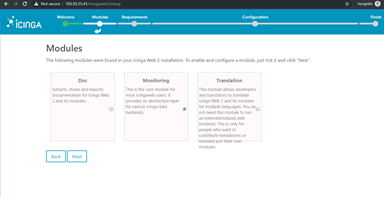
In the next screen, you can choose to enable the modules that were installed during the Icinga 2 installation. Click Next.
The following page shows the information about the system, time zone, and PHP extensions.
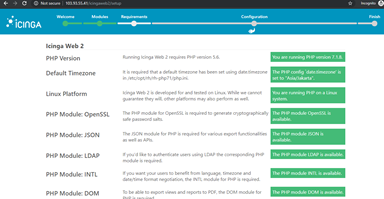
You may get a warning message for missing PHP Image Magic extension on RHEL 7.
# yum -y install http://mirror.centos.org/centos/7/sclo/x86_64/sclo/sclo-php71/sclo-php71-php-pecl-imagick-3.4.3-2.el7.x86_64.rpm
# systemctl restart httpd
# systemctl restart rh-php71-php-fpm
If there are any warnings or error for other PHP extensions, then install the required extensions and then click the Refresh button.
Otherwise, click Next.
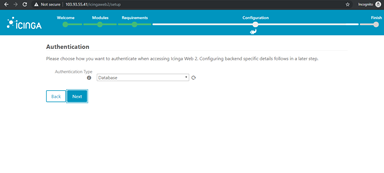
In the next page, you need to tell how you want to authenticate when accessing Icinga Web 2. Icinga Web 2 supports Active Directory, LDAP, and Local as an authentication mechanism.
Here, we will create a local Icinga Web 2 user account. So, select the authentication type as Database and click Next.
Log in to MySQL server.
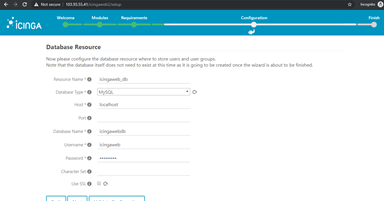
# mysql -u root -pCreate a database for Icinga Web 2 to store authentication information.
CREATE DATABASE icingawebdb;
grant all privileges on icingawebdb.* to icingaweb@localhost identified by 'icinga123';
quit
Enter the database details in the following window and click Next.
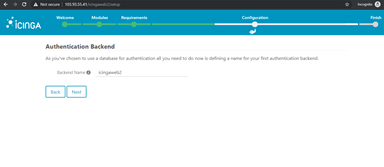
Set the authentication backend name and then click Next.
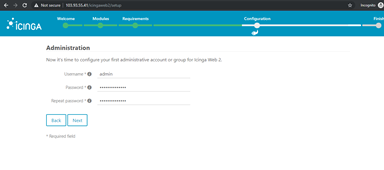
Enter the admin account details on the next screen. Keep a note of this account information as you would need this for accessing Icinga Web 2, later.
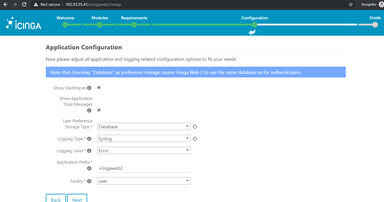
Choose where to save the application and logging-related configurations. Click Next.
Review your settings on the next screen.
Click Next.
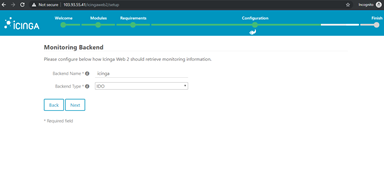
Click Next on the configuration of the monitoring module for Icinga Web 2.

Configure monitoring back end which tells how Icinga Web 2 retrieve the monitoring information. Here, we use IDO.
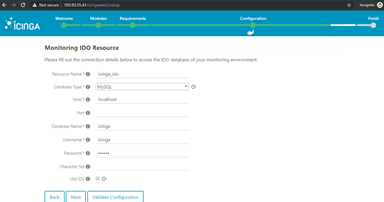
Enter the IDO database details on the following screen and then click Next.
Icinga 2 API
Run the below command to setup Icinga 2 API.
# icinga2 api setupOutput:
Get the API user details from /etc/icinga2/conf.d/api-users.conf file.
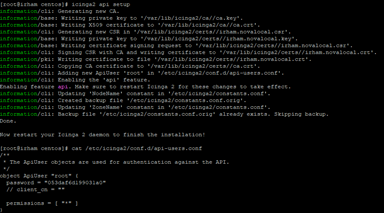
Restart the Icinga 2 service.
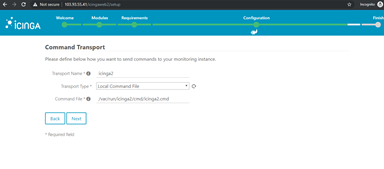
# systemctl restart icinga2Use the above username and password on the below command transport page.
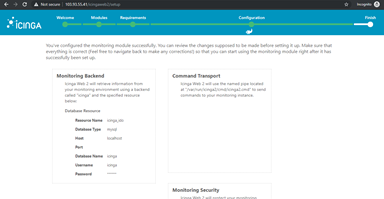
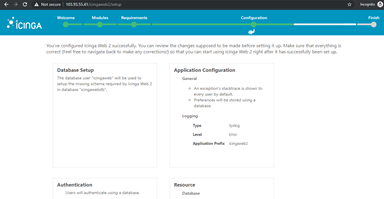
The following page tells you that Icinga Web 2 has been successfully set up.
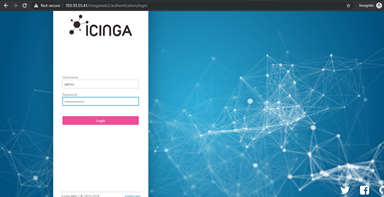
Click on Login to Icinga Web 2.
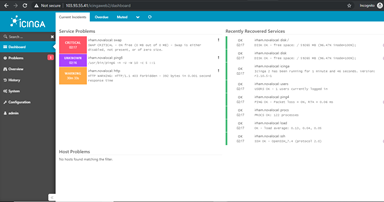
You should get the Icinga Web 2 dashboard. Here where Icinga Web 2 reports for problems.
C. Closure
With the Icinga tools, it can make it easier for you to monitor your server at any time.
Hopefully this article can help you. Find more help through the Biznet Gio Knowledge Base. If you still have problems, please contact support@biznetgio.com or (021) 5714567.
Popular Articles
-
Cara Install & Konfigurasi Monitoring Cacti Serta Mengetahui Fungsi Fitur Pada Cacti
14 people say this guide was helpful
-
Cara Mengaktifkan Telnet pada Windows 7, 8 dan 10
5 people say this guide was helpful
-
Install dan Konfigurasi Samba Server pada Ubuntu
4 people say this guide was helpful
-
Jenis-Jenis Software Virtualisasi untuk Membuat Virtual Machine
7 people say this guide was helpful